


Sunday 4 August 2013
How to Use Asp.net CheckBoxList
Asp.net check box list is used to display more than one check box's .Using this we can display check box directly or from database .
Syntax :
<asp:CheckBoxList ID="CheckBoxList ID" runat="server">
<asp:ListItem Value="value"> Check box text </asp:ListItem>
</asp:CheckBoxList>
asp:ListItem is used to specify the check box list items, using this we can create multiple items.
Example:
Display favorite Language :
Design:

Code:
<form id="form1" runat="server">
<div>
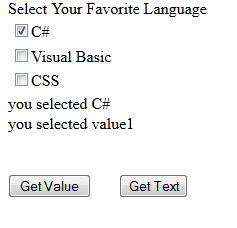
Select Your Favorite Language
<asp:CheckBoxList ID="CheckBoxList1" runat="server" >
<asp:ListItem Value="value1">C#</asp:ListItem>
<asp:ListItem Value="value2">Visual Basic</asp:ListItem>
<asp:ListItem Value="value3">CSS</asp:ListItem>
</asp:CheckBoxList>
<asp:Label ID="Label1" runat="server"></asp:Label>
<br />
<br />
<asp:Button ID="Button1" runat="server" Text="Get Value"
onclick="Button1_Click" />
<asp:Button ID="Button2" runat="server" onclick="Button2_Click" Text="Get Text"
Width="69px" />
</div>
</form>
.CS Page
//Button 1 retrieve Text value of current selection
protected void Button1_Click(object sender, EventArgs e)
{
foreach (ListItem item in CheckBoxList1.Items)
{
if (item.Selected == true)
{
Label1.Text += "you selected " + item.Text + "<br />";
}
}
}
//Button 2 retrieve ID value of current selection
protected void Button2_Click(object sender, EventArgs e)
{
foreach (ListItem item in CheckBoxList1.Items)
{
if (item.Selected == true)
{
Label1.Text += "you selected " + item.Value + "<br />";
}
}
}
Result:
Syntax :
<asp:CheckBoxList ID="CheckBoxList ID" runat="server">
<asp:ListItem Value="value"> Check box text </asp:ListItem>
</asp:CheckBoxList>
asp:ListItem is used to specify the check box list items, using this we can create multiple items.
Example:
Display favorite Language :
Design:
Code:
<form id="form1" runat="server">
<div>
Select Your Favorite Language
<asp:CheckBoxList ID="CheckBoxList1" runat="server" >
<asp:ListItem Value="value1">C#</asp:ListItem>
<asp:ListItem Value="value2">Visual Basic</asp:ListItem>
<asp:ListItem Value="value3">CSS</asp:ListItem>
</asp:CheckBoxList>
<asp:Label ID="Label1" runat="server"></asp:Label>
<br />
<br />
<asp:Button ID="Button1" runat="server" Text="Get Value"
onclick="Button1_Click" />
<asp:Button ID="Button2" runat="server" onclick="Button2_Click" Text="Get Text"
Width="69px" />
</div>
</form>
.CS Page
//Button 1 retrieve Text value of current selection
protected void Button1_Click(object sender, EventArgs e)
{
foreach (ListItem item in CheckBoxList1.Items)
{
if (item.Selected == true)
{
Label1.Text += "you selected " + item.Text + "<br />";
}
}
}
//Button 2 retrieve ID value of current selection
protected void Button2_Click(object sender, EventArgs e)
{
foreach (ListItem item in CheckBoxList1.Items)
{
if (item.Selected == true)
{
Label1.Text += "you selected " + item.Value + "<br />";
}
}
}
Result:
0 comments:
Post a Comment